A bright & airy photo
Me again! This is my part two post, of ‘how to take a bright and airy photo’. I promised in my previous post that I’ll explain a bit on how I use my manual settings on my Canon EOS 70D. Keep in mind, I am not a professional photographer by any means. I’ve just watched a few youtube videos and played with the settings. A lot of trial and error.. and a lot of photos! I’ll try to keep this very basic!
I like to use the manual setting simply because this lets me bring in lots of extra light, which give you that “bright and airy” look your photos.
I always start with the ISO setting= how sensitive the camera is to light. If it’s really bright out I’ll leave the ISO nice and low 100 to 400, when I’m in a darker room I’ll bring up the ISO accordingly. If you are setting up your baby infant of a window as shown in the #babymoments app, you’ll want your ISO to be on the lower end.
Then I liked to think about the Aperture: How much light enters though the lens, which is measured in ‘f-stops‘.
The lower the ‘f-stop’, the more light coming through the lens= bright photos. I typically like to have my f-stop low 1.2, 1.4,- 4.0. (Note: A great lens to start is the 50mm or 40mm-that I used in the above photos.) Lower f-stops not only allow for more light to come in, but also gives you that blurry landscape (“broken”) behind your subject. This is called depth of field (DOF)- the amount of your shot that will be in focus. Large DOF means that most of your image will be in focus (high f-stop ex: f/22). Small or shallow depth of field means that only a part of your image will be in focus. For example your sweet baby, with all the pillows on your bed blurred out in the background (low f-stop 1.4-4.5). Again, for a blurred background lower your aperture down, ex: f/1.4.
Shutter speed is the length of time that the shutter is open, to expose light into the camera. This is why I like to play around with the SS in terms of controlling the light.
When you look on your camera screen, or the view finder you’ll see a scale of numbers will 0 being in the centre. I like to have my exposure set in-between 0…+1….+2, a bit over exposed. Over exposed photos are very light, whereas underexposed are dark- below the “0”. Some say to keep the exposure exactly on “0”, however as I’ve mentioned I like them a bit more over exposed.
All that being said, you need light! Shoot your photos with a space that is well lit, and by that I mean NATURAL LIGHT. I can even capture some great shots with my iPhone by simply having natural light!
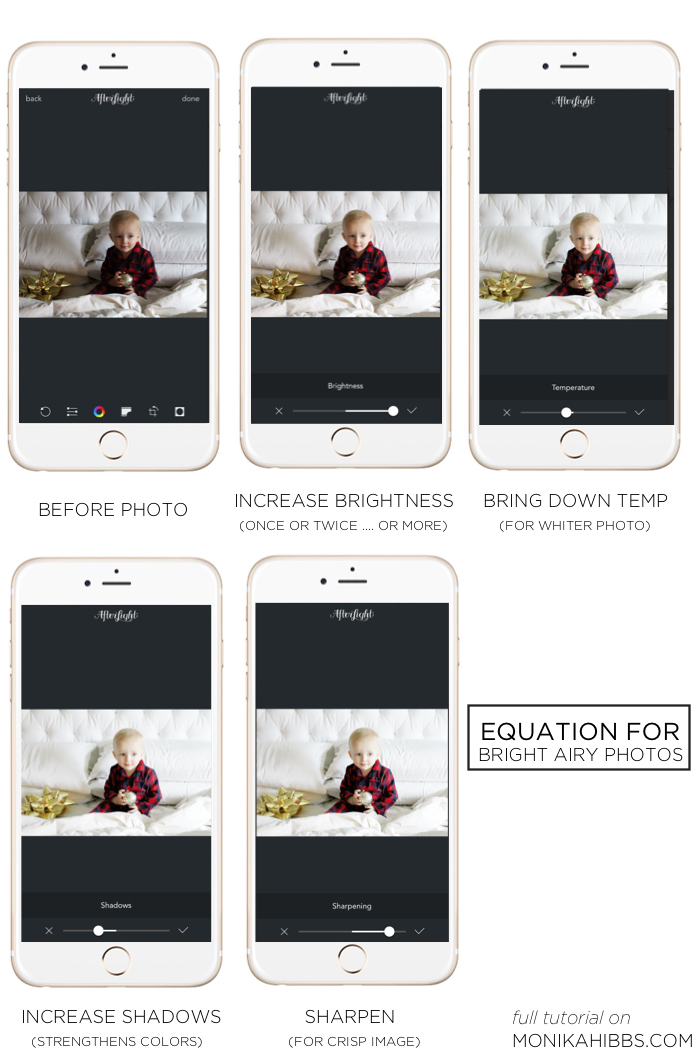
Okay now all that work to still fix up a photo with a little bit of editing! I do edit my photos either on my computer or on my phone. So not take those amazing photos you just captured an add a little extra to them. Using your smart phone can be really quick and easy, send yourself the photo you jus shot on your SLR and upload it onto your phone. I like to use: Afterlight, Snapseed, PicTapGo which can all be found in your app store.
Here are a few things that I always tend to adjust:
1. Bring up the brightness/ exposure to brighten your photo a bit more.
2. Bring down the shadows a bit to bring out the colors, incase they washed out a bit with the brightening.
3. Bring down the temperature a tad if you are still finding your photo a bit yellow.
4. Sharpen the photo to make it extra crisp and sharp.
The demo above shows the before and after using the Afterlight app on your smart phone. I love the expression on Liam’s face in this image, but as you can see it is not the best quality in terms of lighting. This photo is a more underexposed then most of the photos I edit. But I want to show you the difference of how easy it is to transform a not so great photo, or an okay photo and make it look nice and “bright and airy”.
And that’s it! Have fun with your camera and settings! And if some of your photos didn’t quite turn out the way they you wanted them too, a little editing never hurt!


Thanks so much for this! I always love how your photos looks so clean and crisp.
This is seriously one of the best and easiest tutorials I have ever seen on 1. how to edit pictures and 2. how to make them look absolutely gorgeous. Ever since I started using your tips I have noticed an extreme difference in my pictures. Thanks hunny! I have showcased this link in a new series I started on my blog called link love, I hope you don’t mind xx
Lynds
Thank you so much! I just upgraded both my camera and lens and have a pretty fancy set up, but couldn’t figure out how to get light and airy photos! This post was perfect! Thank you so much!